You get one CSV per month and you need them in one table. Copy and paste works once, and then next month you do it again. Power Query can read every file in a folder and stack them into one table that you refresh when a new file arrives.
This guide shows the whole path with four small test files, one of which has a different column order and one of which has a changed header and a blank line. The combined result was not what we first expected, so you will also see what went wrong, how we fixed it, and how a new file showed up after a refresh.
Applies to: Microsoft documents importing a folder of files with Power Query for Excel for Microsoft 365, Excel 2024, Excel 2021, Excel 2019, and Excel 2016. Tested in the Excel desktop app with an English interface on Korean-language Windows. We tested CSV files only and did not test other Excel versions, so menu names may differ.
The files are made up: sales_2026-01.csv to sales_2026-04.csv, each with order_id, region, product, qty, and unit_price. The February file lists the same columns in a different order. The March file calls the first column Order ID and has a blank line after its first row. All values are fictional.
Step 1: Put the Files in One Folder
Put the CSV files in a folder by themselves. Microsoft says every file in the folder and its subfolders is included, and that the files should have matching column headers, data types, and column count. Column order can differ, because Power Query matches columns by name.
Do not save your workbook in that folder. Any other file in the folder would be listed too.
Step 2: Point Excel at the Folder
On the Data tab, choose Get Data > From File > From Folder, and select the folder. Excel lists the files it found.

We saw four files and three buttons: Combine, Load, and Transform Data. Transform Data only opens the list of files. It does not merge them. To merge, use Combine.
Step 3: Combine
Click Combine and then Combine & Transform Data. The Combine Files dialog asks which file to use as the sample and how to read it.
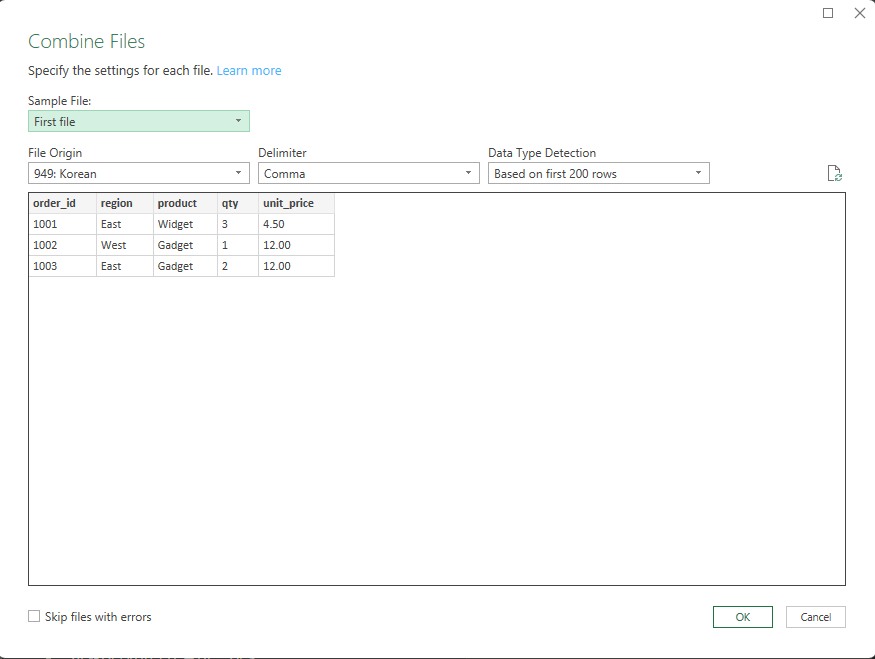
On our computer the dialog showed First file as the sample, Comma as the delimiter, and Based on first 200 rows for data type detection. File Origin was set to 949: Korean, which matches our Korean-language Windows. We did not change any setting. If your files use another encoding, check this box.
Click OK. The Power Query Editor opens with the combined table.
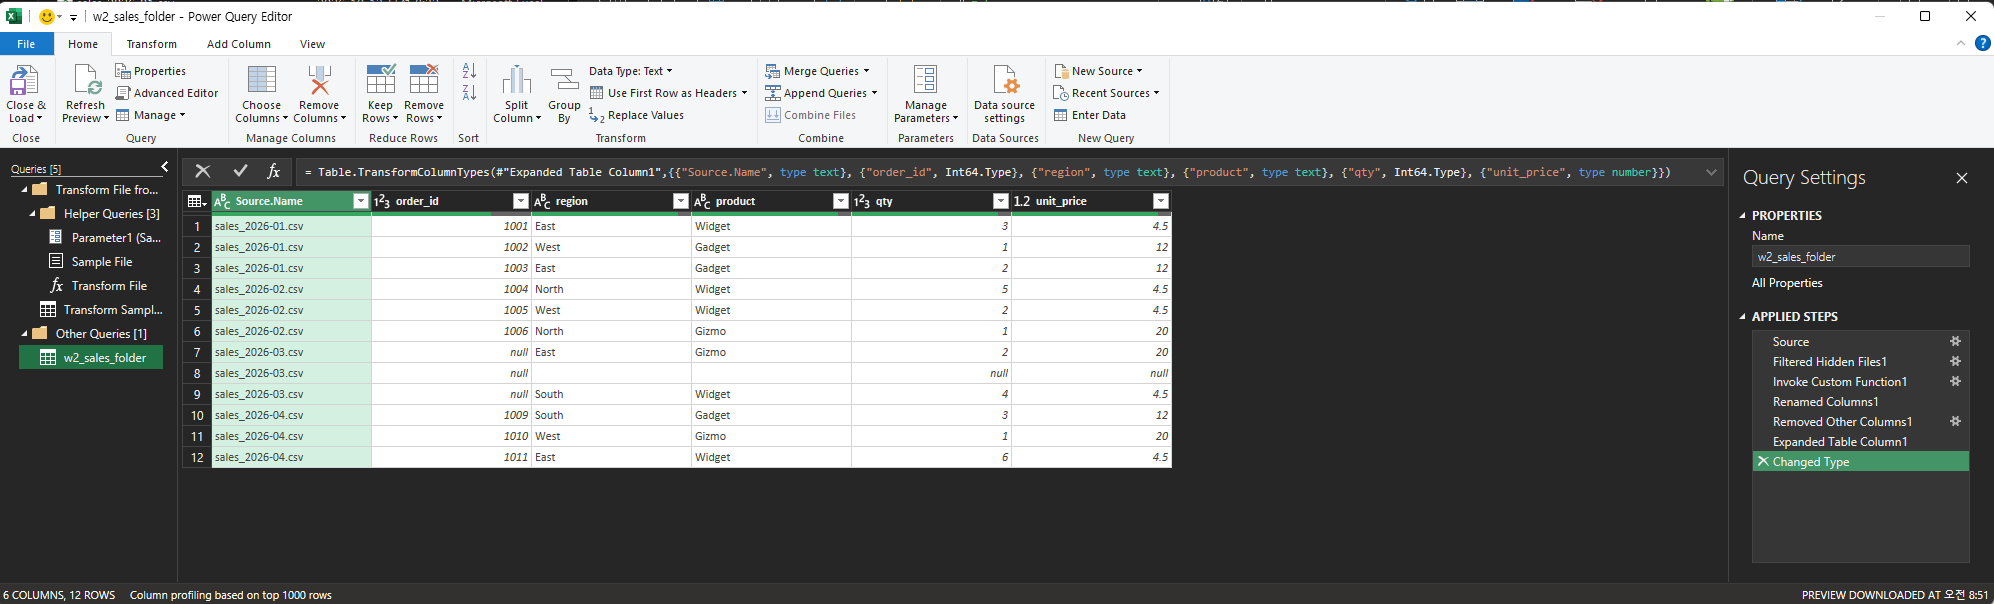
The result had 6 columns and 12 rows. Power Query added a Source.Name column that shows which file each row came from. On the left it created helper queries (Sample File, Parameter1, Transform File, and Transform Sample File), and the main query ended with these steps: Source, Filtered Hidden Files1, Invoke Custom Function1, Renamed Columns1, Removed Other Columns1, Expanded Table Column1, and Changed Type.
The formula bar shows that the automatic Changed Type step set order_id and qty to whole numbers (Int64.Type). If your IDs have leading zeros, that step will remove them. See our guide to keeping leading zeros before you load.
What We Did Not Expect: A Silent Null and a Blank Row
Our test data had 11 orders, so we expected 11 rows. We got 12, and two of the rows were wrong.

- Different column order worked. The February rows (
1004to1006) lined up correctly even though the columns were in another order in the file. That matches Microsoft’s statement that columns are matched by name. - A changed header did not work, and there was no error. We expected an extra
Order IDcolumn. Instead there was no such column, and the March rows (1007and1008) hadnullinorder_idwhile the other values came through. Our guess is that theRemoved Other Columns1step keeps only the columns found in the sample file. We did not verify that, so check your own result row by row. - The blank line became a row. The blank line in the March file turned into one row where only
Source.Namehad a value and everything else wasnull.
The lesson is that a single mismatched header does not stop the combine. The data can come through with a column silently empty. After you combine, look at the rows from each file, not only the first one.
Fix It in the File-Level Query, Not the Combined One
Because every file is processed by the same helper query, we fixed the problems there. In the left pane we opened Transform Sample File and added two steps.
First, a new step that renames the one header we knew was wrong. We selected the last step, clicked the fx button next to the formula bar, and replaced the text with this formula (the step before it was named Promoted Headers):
= Table.TransformColumnNames(#"Promoted Headers", each if _ = "Order ID" then "order_id" else _)Then, on the Home tab, we chose Remove Rows > Remove Blank Rows.

This renames only the header Order ID and leaves every other name alone, so the files that already use order_id are not affected. It also means the fix only covers this one known difference. A different mismatch needs its own rule.
We did the blank-row cleanup in this file-level query on purpose. After the combine, the blank row has a file name in Source.Name, so it is no longer a completely empty row. We did not test Remove Blank Rows on the combined query.
For background on how Power Query treats a missing value versus an empty string, see our guide on null and empty string in Power Query.
Back on the main query, the preview now had 6 columns and 11 rows, with order_id filled from 1001 to 1011.

Load It Into Excel
On the Home tab, click Close & Load. The table appears on a new sheet. Open Data > Queries & Connections to see how many rows were loaded.

The pane showed 11 rows loaded. for our query.
Keep It Refreshable: Add a File and Refresh
This is what you do every month. We copied a fifth file, sales_2026-05.csv, into the same folder, then clicked Data > Refresh All. We did not open the query or change anything.

The table grew by the two May rows (1012 and 1013), and the pane showed 13 rows loaded. Microsoft also says you can refresh the combined query to pick up new files, such as a new file each month.
If a new file arrives with a different header, the same silent-null problem from earlier can come back. Check the rows from the newest file after every refresh.
What We Did Not Test
- Folders of Excel workbooks (
.xlsx). We used CSV files only. - Files in subfolders. Microsoft says they are included. We did not try it.
- Files with more or fewer columns than the sample file.
- A sample file other than First file.
- Other Excel versions, other regional settings, and other file encodings.
- Saving the workbook and refreshing it later.
Which Version of Excel Do You Need?
Microsoft lists Excel for Microsoft 365, Excel 2024, Excel 2021, Excel 2019, and Excel 2016 for importing data from a folder with Power Query. We tested one desktop Excel build (English interface, Korean-language Windows), so button names may differ in other versions.
One-line Summary
Use Data > Get Data > From File > From Folder, choose Combine (not Transform Data), check the rows from every file for silent nulls and blank rows, fix the problems in the Transform Sample File query, load the result, and refresh when a new file is added to the folder. If you also import dates, see our guide to fixing dates after a CSV import.
Sources
- Import data from a folder with multiple files (Power Query) — Microsoft Support. Backs the Data > Get Data > From File > From Folder path, the Combine and Combine & Transform Data options, the statement that all files in the folder and its subfolders are included, the requirement for matching headers, the statement that column order can differ because columns are matched by name, the refresh statement, and the Applies-to list.
- Note: the 12-row first result, the null
order_idvalues in the March rows, the blank line that became a row, the fix in Transform Sample File, the11 rows loadedand13 rows loadedmessages, and the automaticInt64.Typeonorder_idandqtycome from our own reproduction in the Excel desktop app, not from this page.