Author: CleanSheetHQ Editorial Team

  • ISO 8601 Timestamps in Excel: Handle Time Zone Offsets Safely With Power Query

    An ISO 8601 timestamp looks like 2026-03-05T14:30:00Z or 2026-03-05T23:30:00+09:00. The ending tells you which time zone the clock time belongs to. Exports from apps, logs, and APIs often use this format.

    The risk in Excel is that the ending can be dropped or reinterpreted on the way in, and the cell then shows a time that no longer matches the moment in the file. This guide shows what we observed on one test file, and how Power Query’s DateTimeZone.ToUtc lined the values up.

    Tested in: Excel 2021 desktop (Version 2608) with an English interface, Windows time zone (UTC+09:00) Seoul. Screenshots were captured in Excel 2021 with an English interface on Windows using Korean regional settings; time values may display with Korean AM/PM markers. We did not test other time zones, other Excel versions, or Mac, and results may differ there.

    Our Test File

    The CSV has five moments, each written four ways in four columns:

    ColumnExample (first row)
    ts_utc_z2026-03-05T14:30:00Z
    ts_offset_plus92026-03-05T23:30:00+09:00
    ts_offset_minus052026-03-05T09:30:00-05:00
    ts_no_zone2026-03-05T14:30:00

    The first three columns are the same instant. ts_no_zone has the same digits as the Z column but no ending at all.

    Opening the CSV by Double-Click

    When we double-clicked the file, all four columns arrived as left-aligned text, with the T and the endings kept exactly as written.
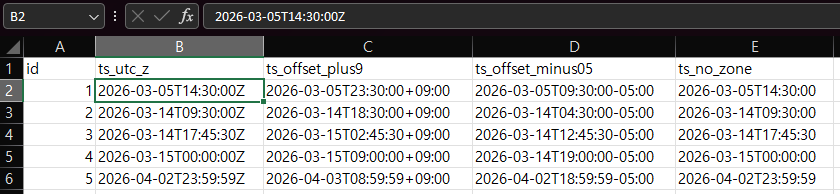
    CSV opened in Excel with four ISO 8601 timestamp columns left-aligned as text, cell B2 showing 2026-03-05T14:30:00Z
    Opened by double-click: the ISO strings stay as text.

    In this test, ISO strings containing a T stayed as text when opened by double-click.

    Importing With Data > From Text/CSV

    When we imported the same file with Data > From Text/CSV and opened Transform Data, Power Query had added a Changed Type step on its own:

    Power Query Editor with an automatic Changed Type step; the ts_utc_z column shows 2026-03-05 11:30:00 PM for a file value of 14:30Z
    Automatic Changed Type: the Z column shows 11:30 PM for a file value of 14:30Z.

    The result differed by column:

    • ts_utc_z became a date-time and showed 11:30:00 PM for the file value 14:30:00Z, nine hours later than the file.
    • ts_offset_plus9 and ts_offset_minus05 became date-time-zone values and kept their offsets (+09:00, -05:00).
    • ts_no_zone became a plain date-time and showed 2:30:00 PM, unchanged.

    We did not investigate why the Z column moved while the offset columns did not. Microsoft’s documentation says Power Query detects data types automatically for CSV files, based on the first 200 rows. The point for you is that a type step you did not write can change what a column means, so check it.

    Reading the Text Yourself With DateTimeZone.FromText

    To control the conversion, we wrote our own query that reads the columns as text and parses each one with DateTimeZone.FromText. Now the offsets were visible and the Z column read as +00:00, with no nine-hour shift:

    Power Query Editor after DateTimeZone.FromText showing +00:00, +09:00, and -05:00 offsets on the timestamp columns
    After DateTimeZone.FromText: each value carries its offset.

    Look at ts_no_zone. It has no ending in the file, but Power Query showed it as 2:30:00 PM +09:00. In our test, a string with no time zone was read as being in this PC’s time zone, which is Seoul. Keep that in mind for the conversion below.

    What Happens When You Load It to a Sheet

    We loaded this parsed query to a worksheet. The offsets did not come along. The cells show only a date and a time, with no time zone label:
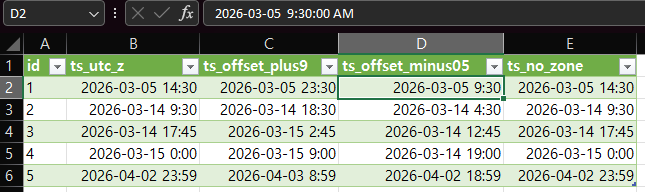
    Worksheet table with timestamp columns showing no time zone labels; the same instant appears as 14:30, 23:30, and 9:30 in different columns
    On the sheet, the offset is gone: one instant shows as 14:30, 23:30, and 9:30.

    In row 1, the Z column shows 14:30, the +09:00 column shows 23:30, and the -05:00 column shows 9:30, though all three are the same instant. The ts_no_zone column also shows 14:30, which looks identical to the Z column even though Power Query had read it as +09:00.

    Microsoft’s Power Query documentation says a date-time-zone value is converted to a date-time when loaded into the model. We observed the same loss when loading to a worksheet table. We only tested Excel 2021 with a Seoul time zone, so we can only say it can happen, not that it always does.

    Line Them Up in UTC

    The fix is to convert every value to one reference time zone before it reaches the sheet. We used three steps after the header row is promoted:

    1. DateTimeZone.FromText reads each string into a date-time-zone value.
    2. DateTimeZone.ToUtc converts each one to UTC.
    3. DateTimeZone.RemoveZone drops the zone label, so the column loads cleanly as a plain date-time that is known to be UTC.

    Note: in our test (Excel 2021, Windows time zone UTC+09:00 Seoul), a column with no time zone ending was read as +09:00, which matches the PC’s time zone. We did not test other time zones, so confirm which zone the data was written in before using the result.

    This code is an example for our five-column test CSV, not a general import. Two settings in the first line limit it. Columns = 5 makes Power Query read five columns; according to Microsoft’s documentation, extra columns in a wider file are ignored, so you could lose data without an error, and missing columns are added empty. QuoteStyle = QuoteStyle.None treats every line break as the end of a row, even inside a quoted value. Our test file has no quoted fields, so that is safe here. If your file has quoted text that contains line breaks, remove that option, because the default, QuoteStyle.Csv, keeps quoted line breaks as part of the value. We did not test files like that, or files with a different number of columns.

    let
        Source = Csv.Document(File.Contents("C:\Path\To\your-file.csv"), [Delimiter = ",", Columns = 5, Encoding = 65001, QuoteStyle = QuoteStyle.None]),
        Promoted = Table.PromoteHeaders(Source, [PromoteAllScalars = true]),
        Parsed = Table.TransformColumns(Promoted, {
            {"ts_utc_z", each DateTimeZone.FromText(_), type datetimezone},
            {"ts_offset_plus9", each DateTimeZone.FromText(_), type datetimezone},
            {"ts_offset_minus05", each DateTimeZone.FromText(_), type datetimezone},
            {"ts_no_zone", each DateTimeZone.FromText(_), type datetimezone}}),
        ToUtc = Table.TransformColumns(Parsed, {
            {"ts_utc_z", each DateTimeZone.ToUtc(_), type datetimezone},
            {"ts_offset_plus9", each DateTimeZone.ToUtc(_), type datetimezone},
            {"ts_offset_minus05", each DateTimeZone.ToUtc(_), type datetimezone},
            {"ts_no_zone", each DateTimeZone.ToUtc(_), type datetimezone}}),
        UtcNoZone = Table.TransformColumns(ToUtc, {
            {"ts_utc_z", each DateTimeZone.RemoveZone(_), type datetime},
            {"ts_offset_plus9", each DateTimeZone.RemoveZone(_), type datetime},
            {"ts_offset_minus05", each DateTimeZone.RemoveZone(_), type datetime},
            {"ts_no_zone", each DateTimeZone.RemoveZone(_), type datetime}})
    in
        UtcNoZone

    Replace C:\Path\To\your-file.csv with the full path to your CSV file, and replace the column names with your own. In Power Query, you can paste this into Home > Advanced Editor.

    Here is the ToUtc step. The first three columns show the same value in each row, +00:00. The ts_no_zone column, selected, shows a different one:

    Power Query Editor with DateTimeZone.ToUtc applied, showing UTC results for timestamp columns and the ts_no_zone column highlighted
    After ToUtc: three columns match; ts_no_zone shows 5:30 AM where the others show 2:30 PM.

    In row 1, the three real-offset columns show 2:30:00 PM +00:00. The ts_no_zone column shows 5:30:00 AM +00:00, nine hours earlier. This follows from the earlier step: the string was read as Seoul time, so converting it to UTC moved it back nine hours.

    After loading the finished query, the sheet shows the three columns with matching values:

    Worksheet table where ts_utc_z, ts_offset_plus9, and ts_offset_minus05 show identical date-times while ts_no_zone shows earlier times
    Loaded to the sheet: three columns now match; ts_no_zone differs.

    Row 1 reads 2026-03-05 14:30 in all three, and the later rows match as well (9:30, 17:45, 0:00, 23:59).

    Microsoft’s pages describe the functions this way: DateTimeZone.ToUtc “changes timezone information of the datetime value … to the UTC”. DateTimeZone.RemoveZone returns a date-time with the time zone information removed. Their FromText page shows ISO 8601 strings with numeric offsets such as -08:00; it does not mention a trailing Z, and the Z reading above is what we observed.

    Strings With No Time Zone

    The ts_no_zone column is the risky one. Excel cannot know which zone the writer meant. In our test it was read as Seoul time, so it landed nine hours away from the same-looking Z column. If those strings were really written in UTC, treating them as local would be wrong. Ask whoever produced the file which zone they meant before you convert. We did not test how to force a different assumed zone, so this guide does not cover it.

    Things to Know

    • Scope. Everything above is from one test file on Excel 2021 with a Seoul time zone. Results can differ with another time zone or Excel version, and we did not test Mac.
    • After RemoveZone. The sheet cells no longer say they are UTC, so label the column or sheet.
    • Dates only. If your values are plain dates, see fixing dates after a CSV import. For splitting a date-time that is already text, see splitting date and time in one cell.

    One-line Summary

    Before loading ISO 8601 timestamps with Z or an offset into a sheet, parse them with DateTimeZone.FromText, convert with DateTimeZone.ToUtc, and drop the label with DateTimeZone.RemoveZone, because in our Excel 2021 / Seoul test the sheet kept no offset.

    Sources

  • Remove Line Breaks From Cells in Excel (Ctrl+J, SUBSTITUTE, Power Query)

    Text pasted or imported into Excel can arrive with line breaks inside the cell, so one address takes three lines. This guide tries three ways to turn those breaks into spaces: Find & Replace with Ctrl+J, formulas, and Power Query. It also shows two things that went wrong in our tests, so you know what to look for.

    Tested in: Excel 2021 desktop (Home & Business 2021, Version 2608) with an English interface on Korean-language Windows. We did not test other versions or Excel for Mac.

    The Test Data

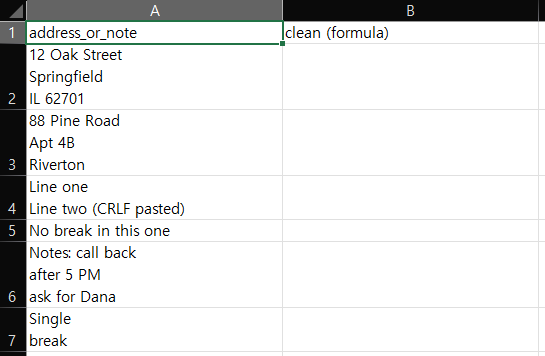
    Our LineBreaks sheet has six cells in column A. Three of them have two line breaks (two addresses and a note). Two have one line break, and one has none (No break in this one). One of the single-break cells, Line one / Line two (CRLF pasted), was created on purpose with a Windows-style line ending (a carriage return followed by a line feed). The other line breaks are a line feed only. All text is made up.

    LineBreaks sheet with six cells in column A, several showing two or three lines of text inside one cell
    Six test cells. Five contain line breaks.

    Method 1: Find & Replace With Ctrl+J

    Work on a copy of the sheet, because Replace All changes the cells in place.

    1. Select the cells, then press Ctrl+H.
    2. Click in Find what and press Ctrl+J.
    3. Put a single space in Replace with.
    4. Click Replace All.

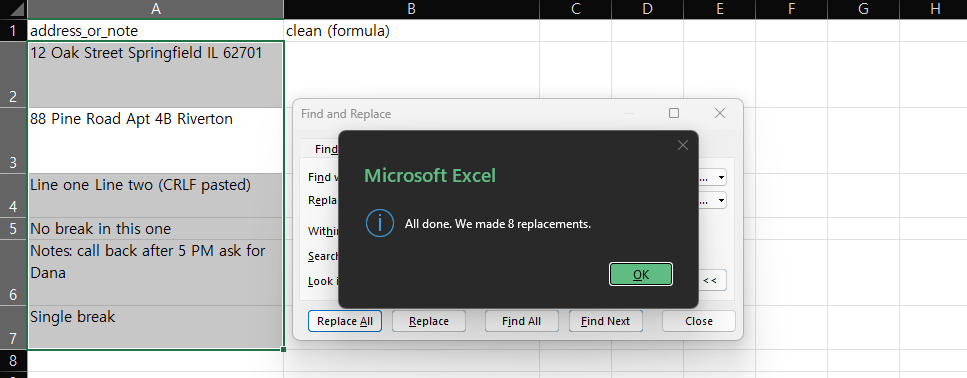
    Excel reported “We made 8 replacements.” and every cell became a single line. Eight matches the number of line feeds in our six cells.

    Excel message 'All done. We made 8 replacements' above cells that now read as single lines
    Ctrl+J in Find what, a space in Replace with: 8 replacements.

    What went wrong the first time: our first Replace All said “We couldn’t find anything to replace.” The Ctrl+J had not actually been entered in the Find what box. After re-entering it, the replacement worked. We did not find out why the first attempt failed.

    We did not check whether the carriage return in the CRLF cell was still there after this method. The formulas below did check it.

    Method 2: Formulas

    We put three formulas next to the data, in columns B, C and D, and compared them:

    B2: =TRIM(SUBSTITUTE(SUBSTITUTE(A2,CHAR(13),""),CHAR(10)," "))
    C2: =SUBSTITUTE(A2,CHAR(10)," ")
    D2: =CLEAN(A2)
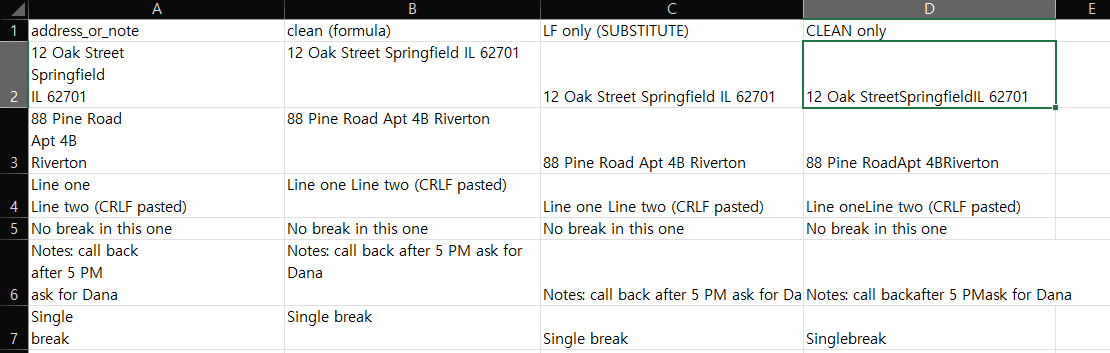
    Three formula columns next to the line-break data; the CLEAN column joins words such as StreetSpringfieldIL
    B and C look the same. D (CLEAN) removes the breaks but joins the words.

    Column B gave a clean single line on all six rows, for example 12 Oak Street Springfield IL 62701. Column C looked the same as B on screen.

    Column D, the CLEAN version, removed the line breaks but did not put a space in their place, so words ran together: 12 Oak StreetSpringfieldIL 62701 and Singlebreak. If you want readable text, use SUBSTITUTE with a space.

    Why the CRLF cell needs CHAR(13)

    B and C look identical, but they are not. We compared their lengths with =LEN(C2)-LEN(B2):

    Length-difference column showing 0, 0, 1, 0, 0, 0 for the six rows
    Only row 4, the CRLF cell, is one character longer in column C.

    The six results were 0, 0, 1, 0, 0, 0. Only row 4 (the CRLF cell) differed. Replacing only CHAR(10) left one extra invisible character in that cell. We read that as the leftover carriage return, and the CHAR(13) in column B’s formula removes it. We created that cell on purpose. We cannot say how often your data has this ending.

    Method 3: Power Query

    In Power Query, use Replace Values twice, on the text column.

    First replace the line feed with a space. In the Replace Values dialog, type #(lf) in Value To Find, expand Advanced options, and check Replace using special characters. Put a space in Replace With.

    Replace Values dialog with #(lf) in Value To Find and Replace using special characters checked under Advanced options
    Replace Values with ‘Replace using special characters’ checked.

    After this step, the CRLF row still showed two lines in the preview. Then add a second Replace Values step for #(cr), with Replace With left empty and the same checkbox checked. All six rows were then single lines:

    Power Query preview with six single-line rows after two Replace Values steps for line feed and carriage return
    Two steps, line feed to space and carriage return removed: six single lines.

    Two mistakes cost us time, and both are easy to repeat:

    • The checkbox. We typed #(cr) with Replace using special characters unchecked. The formula bar showed #(#)(cr), so Power Query searched for that text and replaced nothing. The checkbox was the likely cause, but its state was not visible in that first attempt.
    • The order. After the first step had already turned each line feed into a space, we searched for #(cr)#(lf). It matched nothing, because that pair no longer existed. Search for #(cr) alone.

    Which Method Did What

    MethodAll six rows single lineKeeps a space between linesHandles the CRLF cell
    Ctrl+J Replace AllYesYes (we typed a space)Not checked
    SUBSTITUTE CHAR(10) onlyLooks yesYesLeaves one extra character
    SUBSTITUTE with CHAR(13) and TRIMYesYesYes
    CLEAN onlyYesNo, words joinNot checked
    Power Query, two stepsYesYesYes

    Things to Know

    • Formulas leave the original alone. Columns B to D are new columns, so column A is unchanged. Find & Replace overwrites the cells.
    • Extra spaces. The TRIM in column B also removes extra ordinary spaces. TRIM does not remove non-breaking spaces; see why TRIM isn’t removing them. We did not test that character here.
    • Splitting instead. If you want the lines in separate cells instead of one line, that is a different task. We did not test it here. For splitting around one character with formulas, see extracting text before or after a character.

    One-line Summary

    Replace the line feed with a space (Ctrl+J in Find & Replace, SUBSTITUTE, or Power Query), and if your data may contain Windows-style CRLF breaks, also remove the carriage return:

    =TRIM(SUBSTITUTE(SUBSTITUTE(A2,CHAR(13),""),CHAR(10)," "))

    Sources

    • Note: every result, including the eight replacements, the length differences, and the Power Query steps, comes from our own reproduction in the Excel 2021 desktop app. We did not check these functions against Microsoft’s documentation for this guide.
  • Split Date and Time in Excel: Separate One Cell Into Date and Time

    A cell like 2026-03-14 09:30:00 holds a date and a time together. To filter by day or sum by hour, you often need them in two columns. How you split it depends on one thing: is the cell a real date-time, or text that looks like one?

    This guide shows both cases on six made-up rows and shows how we told them apart.

    Tested in: Excel 2021 desktop (Home & Business 2021, Version 2608) with an English interface on Korean-language Windows. We did not test other Excel versions.

    Real Date-Time or Text?

    Our DateTime sheet has the same six moments twice. Column A (real_datetime) holds real date-times. Column E (text_datetime) holds text that looks the same. In our sheet the difference showed in the alignment: column A is right-aligned, like a number, and column E is left-aligned, like text.

    DateTime sheet with real date-times right-aligned in column A and text date-times left-aligned in column E
    Same moments, two kinds of cell. Column A is right-aligned, column E is left-aligned.

    Alignment can be changed by the person who built the sheet, so treat it as a hint. For text dates that arrive from a CSV file, see fixing dates after a CSV import.

    Case 1: A Real Date-Time

    Excel stores a date-time as one number. The whole part is the day, and the fraction is the time of day. So the date is the whole part and the time is what is left over.

    In B2, enter:

    =INT(A2)

    In C2, enter:

    =A2-INT(A2)

    Before any formatting, our columns showed plain numbers:

    Column B showing whole numbers such as 46095 and column C showing decimals such as 0.395833333 before formatting
    Before formatting: a day number in B and a fraction of a day in C.

    For 2026-03-14 09:30:00, B showed 46095 and C showed 0.395833333. That is 9:30 as a fraction of a day.

    Now format the columns. We set column B to the date format yyyy-mm-dd and column C to a time format (Format Cells > Custom). The time format we applied displays 9:30:00, with no leading zero on the hour.

    Column B formatted as dates and column C formatted as times, for example 2026-03-14 and 9:30:00
    After formatting: B shows the date and C shows the time.
    OriginalDate (B)Time (C)
    2026-03-14 09:30:002026-03-149:30:00
    2026-03-14 17:45:302026-03-1417:45:30
    2026-03-15 00:00:002026-03-150:00:00
    2026-03-15 23:59:002026-03-1523:59:00
    2026-04-02 12:00:002026-04-0212:00:00
    2026-04-02 12:05:002026-04-0212:05:00

    The midnight row worked too: the time part was 0, shown as 0:00:00. We did not check whether a format is applied to B and C automatically when you enter the formulas.

    Case 2: Text That Looks Like a Date-Time

    If the cell is text, INT is not the right tool. Take the date and time pieces out of the text and convert each one. For text in E2 shaped like 2026-03-14 09:30:

    =DATEVALUE(LEFT(E2,10))
    =TIMEVALUE(MID(E2,12,8))

    LEFT(E2,10) takes the first ten characters, the date. MID(E2,12,8) takes up to eight characters starting at character 12, the time. This worked for both 09:30 and 17:45:30, with and without seconds. After we formatted the results as a date and a time, all six rows converted without an error.

    Text date-times in column E with DATEVALUE results in column F and TIMEVALUE results in column G for six rows
    DATEVALUE and TIMEVALUE on the text version: six rows, no errors.

    Things to Know

    • One text format. Our text dates were all in the form yyyy-mm-dd hh:mm, tested on Windows with Korean regional settings. We did not test other text formats such as 03/14/2026 or other regional settings, so check your own data first.
    • Original data. The formulas sit in new columns, so columns A and E are unchanged.
    • Formatting. The formulas return numbers. Apply a date format and a time format to see them as a date and a time. We did not test what the text-version results look like before formatting.
    • Splitting by position. The text version relies on fixed positions. For splitting text around a character instead, see extracting text before or after a character.

    One-line Summary

    For a real date-time, =INT(A2) gives the date and =A2-INT(A2) gives the time; for text, use DATEVALUE on the first 10 characters and TIMEVALUE on the time part, then format the results.

    Sources

    • Note: every result on this page, including the serial numbers and the six converted rows, comes from our own reproduction in the Excel 2021 desktop app. We did not check these functions against Microsoft’s documentation for this guide.
  • Remove Special Characters in Excel and Keep Only Letters and Numbers

    Sometimes you want a code or a name with only letters and numbers: no dashes, hash signs, commas, or brackets. This guide does that two ways, with an Excel formula and with Power Query. It also lists what these methods remove beyond what you might expect, including spaces and accented letters.

    Tested in: Excel 2021 desktop (Home & Business 2021, Version 2608) with an English interface on Korean-language Windows. We did not test other Excel versions.

    The Test Data

    Our SpecialChars sheet has ten made-up strings in column A, such as ACME-Corp. #42!, SKU_1001/A, and A&B Co., Ltd.. Two are there to test the edges: Café Müller 12 has accented letters, and Spaced Out 9 has extra spaces. One, already_clean, contains an underscore.

    SpecialChars sheet with ten strings in column A including ACME-Corp. #42!, SKU_1001/A, Café Müller 12 and already_clean
    Ten test strings with punctuation, an accented name, extra spaces and an underscore.

    Method 1: One Formula

    In B2, enter this formula and fill it down:

    =LET(t,A2,c,MID(t,SEQUENCE(LEN(t)),1),k,CODE(c),TEXTJOIN("",TRUE,IF((k>=48)*(k<=57)+(k>=65)*(k<=90)+(k>=97)*(k<=122)>0,c,"")))

    Here is what it does:

    • MID(t,SEQUENCE(LEN(t)),1) splits the text into single characters.
    • CODE(c) gives each character’s code number.
    • The IF keeps a character only if its code is 48 to 57 (digits 0 to 9), 65 to 90 (A to Z), or 97 to 122 (a to z).
    • TEXTJOIN joins the kept characters back together.

    The formula ran without errors in our Excel 2021.

    Formula column using LET, SEQUENCE, MID, CODE and TEXTJOIN with results such as ACMECorp42 and SmithJohnVIP
    The LET formula in column B and its results.
    OriginalResult
    ACME-Corp. #42!ACMECorp42
    Smith, John (VIP)SmithJohnVIP
    SKU_1001/ASKU1001A
    100% Pure100Pure
    A&B Co., Ltd.ABCoLtd
    Order #A-77 *rush*OrderA77rush
    Cafe Muller 12CafeMuller12
    Café Müller 12CafMller12
    Spaced Out 9 SpacedOut9
    already_cleanalreadyclean

    What It Removes Besides Punctuation

    The results show three things you might not want:

    • Spaces. Every space is removed, so words join: Smith, John (VIP) becomes SmithJohnVIP.
    • Underscores and hyphens. already_clean became alreadyclean.
    • Accented letters. Café Müller 12 became CafMller12. The é and the ü are gone, not replaced by e and u.

    This follows from the rule: only A-Z, a-z, and 0-9 are kept. If you need spaces or underscores kept, the rule would have to allow more codes. We did not test a changed rule, so check any version on your own data.

    Method 2: Power Query

    In Power Query, add a custom column with this formula:

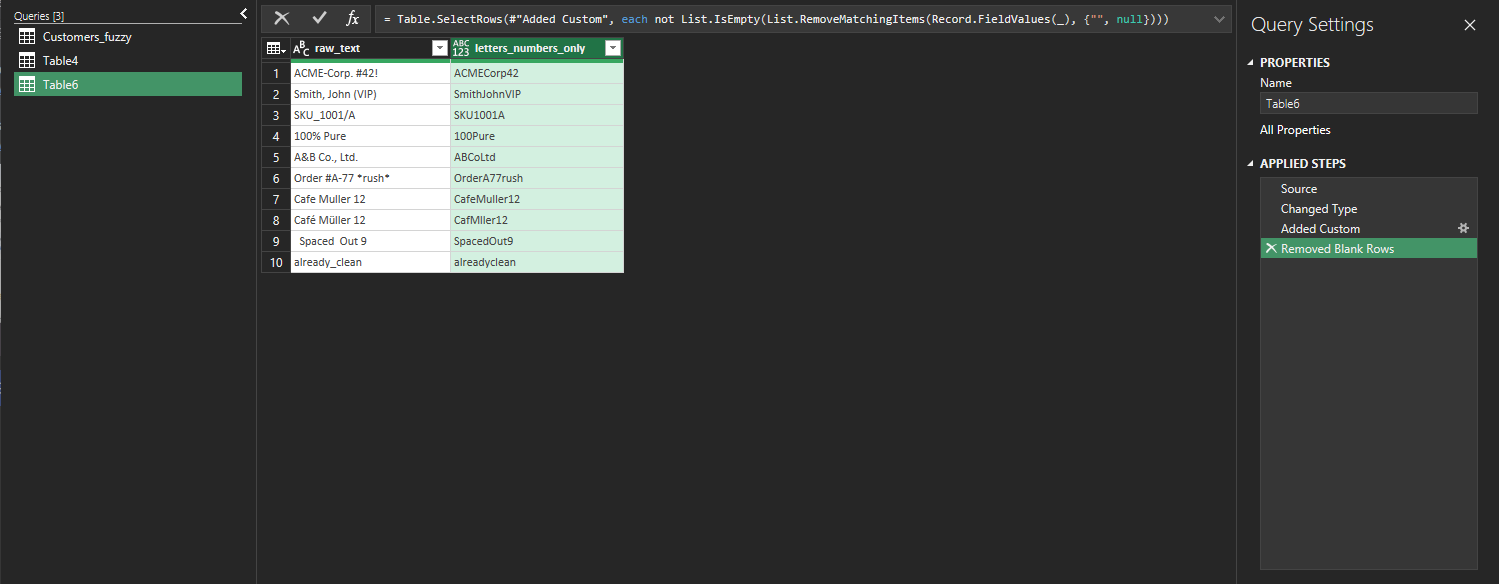
    Text.Select([raw_text], {"a".."z","A".."Z","0".."9"})

    Text.Select keeps only the characters in the list you give it. Ours was the same letters and digits.

    Power Query preview with a Text.Select custom column showing ten results that match the Excel formula, including CafMller12
    Text.Select gives the same ten results as the formula.

    All ten rows matched the Excel formula, including CafMller12.

    One setup problem. Our first attempt showed 999+ rows with empty values after row 10. We had made the Power Query table from a range that was larger than the data. We fixed it by adding a Remove Blank Rows step. Selecting only the data range avoids the problem in the first place.

    Things to Know

    • Only English letters and digits are kept. Letters with accents and letters from other alphabets are removed too. We did not test a way to keep them, and we did not test any regular-expression function.
    • The formula’s code ranges. We tested it on these ten strings and did not try other character sets or other Windows language settings.
    • Original data. Both methods write to a new column, so column A is unchanged.
    • Related. If you only need to clean phone numbers, see our guide on standardizing US phone numbers. For hidden non-breaking spaces, see why TRIM isn’t removing them. We did not test either case here.

    One-line Summary

    To keep only English letters and digits, either use the LET formula above or Text.Select in Power Query. Both gave identical results on our ten strings, and both also removed spaces, underscores, hyphens, and accented letters.

    Sources

    • Note: all ten results and the Power Query comparison come from our own reproduction in the Excel 2021 desktop app. We did not check these functions against Microsoft’s documentation for this guide.
  • Find Near-Duplicate Names in Excel With Power Query Fuzzy Matching

    Removing exact duplicates is easy. Jon Smith and John Smith are not exact duplicates, so a normal duplicate check keeps both. Power Query has a fuzzy merge that can pair up names that are similar but not identical.

    This guide merges a customer list with itself using fuzzy matching and filters out each row’s match with itself. What is left is a list of candidate pairs. We ran it on 18 made-up names and report what it paired, what it missed, and what changed when we lowered the similarity threshold. The result is a candidate list for a person to review, not a final answer.

    Tested in: Excel 2021 desktop (Home & Business 2021, Version 2608) with an English interface on Korean-language Windows. We did not test other Excel versions.

    The List

    Our Customers sheet has one column, customer_name, with 18 names. They include a pair that differs by one letter (Jon Smith, John Smith), a spelling variant (Katherine Lee, Catherine Lee), an exact duplicate (Priya Patel twice), a nickname (Mike Johnson, Michael Johnson), a company name written two ways (Acme Corp, ACME Corporation), a double space (Maria Garcia, Maria Garcia), and two names that may be different people (Dan Brown, Dana Brown). All names are fictional.

    Customers sheet with 18 names in one column, including Jon Smith, John Smith, Priya Patel twice, Acme Corp and ACME Corporation
    18 names in one column. Some are near-duplicates, some are exact duplicates.

    Step 1: Add an Index Column

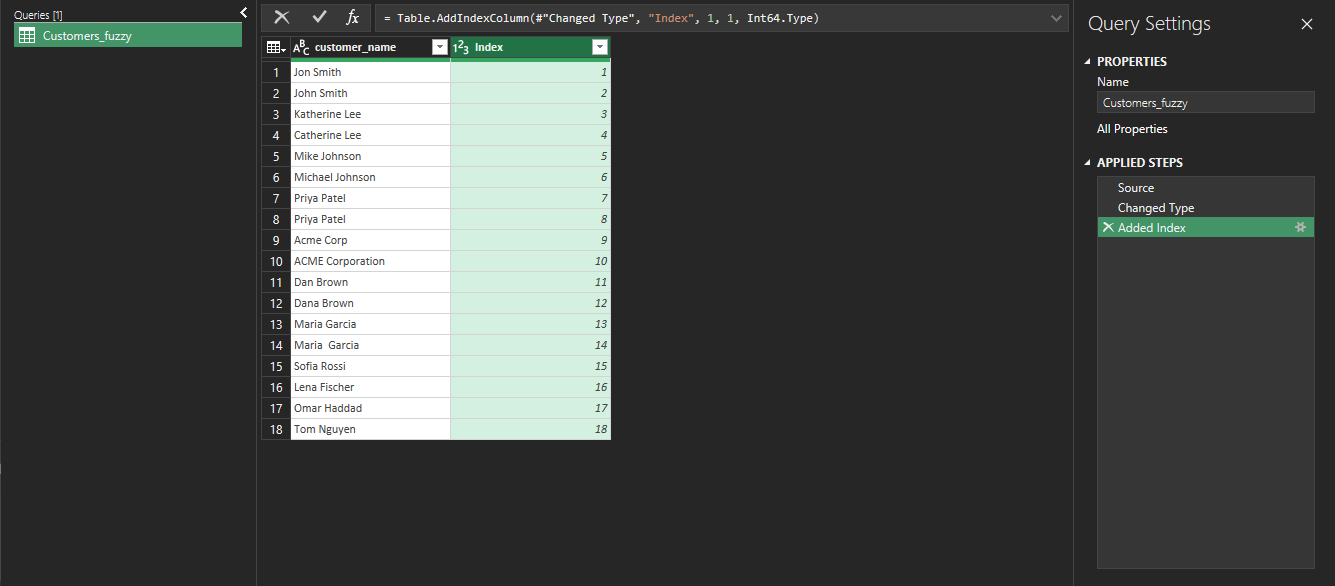
    Load the list into Power Query (select a cell in the list, then Data > From Table/Range). Then add an index column that starts at 1 (Add Column > Index Column > From 1). Our query got a second column called Index with the numbers 1 to 18.

    Power Query editor showing customer_name and an Index column numbered 1 to 18
    The Index column gives every row a number.

    The index matters later. When a list is merged with itself, every name matches itself. The index lets us remove those self-matches.

    Step 2: Merge the Query With Itself

    Choose Home > Merge Queries. In the dialog, the second table can be the same query: ours was listed as Customers_fuzzy (Current). Select customer_name in both tables, set Join Kind to Inner, and check Use fuzzy matching to perform the merge.

    Merge dialog with the same query selected twice, customer_name chosen in both tables, Inner join and fuzzy matching checked
    The same query merged with itself, with fuzzy matching on.

    The fuzzy options in our dialog were: Similarity threshold (optional), Ignore case, Match by combining text parts, Maximum number of matches (optional), and Transformation table (optional). We left the similarity threshold blank for the first run. The screen does not show what default value Power Query uses in that case, so we do not state one.

    Step 3: Expand and Remove Self-Matches

    Expand the new column and keep both customer_name and Index. Power Query names them Added Index.customer_name and Added Index.Index. Then add a custom column named same_row with this formula:

    [Index] = [Added Index.Index]

    Filter same_row to keep only FALSE. A TRUE row is a name matched with itself.

    The Result With the Default Threshold

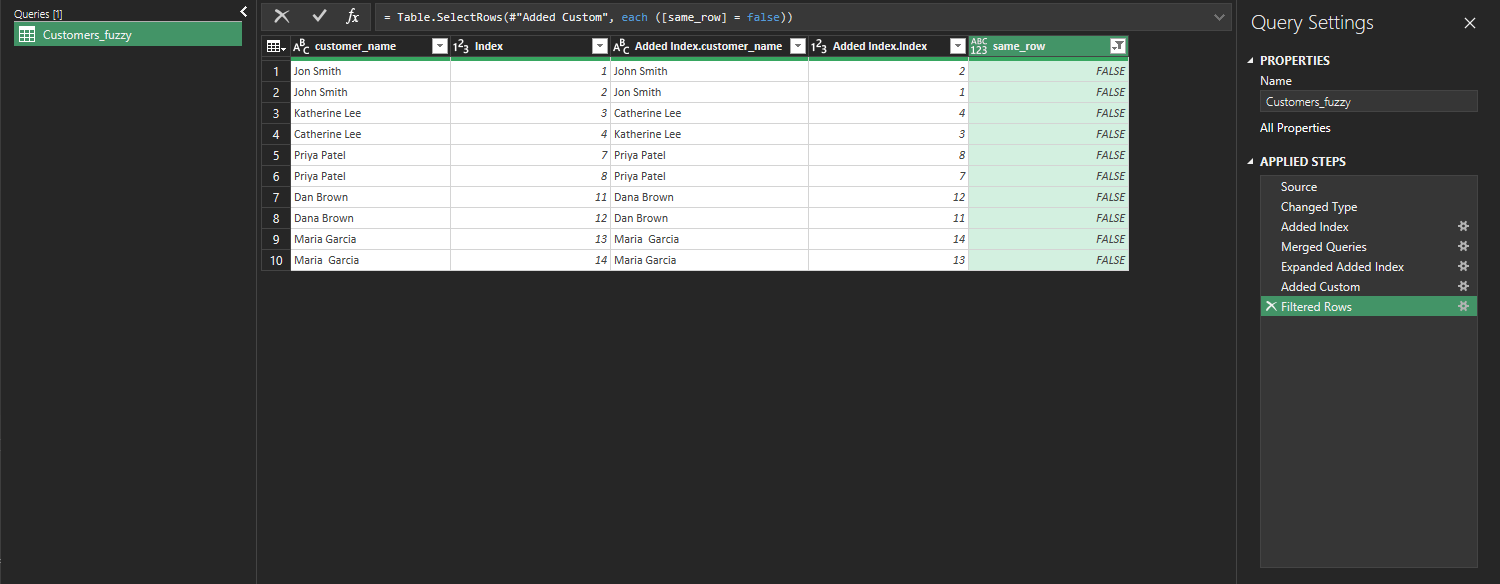
    With the threshold blank, the result had 10 rows. Each pair appears twice, once in each direction, so that is 5 pairs:

    Power Query result with 10 rows pairing Jon Smith and John Smith, Katherine and Catherine Lee, Priya Patel twice, Dan and Dana Brown, and Maria Garcia
    Default threshold: 10 rows, which is 5 pairs counted in both directions.
    PairKind of difference
    Jon Smith and John SmithOne letter
    Katherine Lee and Catherine LeeSpelling variant
    Priya Patel and Priya PatelExact duplicate
    Dan Brown and Dana BrownPossibly two different people
    Maria Garcia and Maria GarciaDouble space

    Two pairs we expected were not in the list: Mike Johnson with Michael Johnson, and Acme Corp with ACME Corporation.

    What Happened When We Changed the Threshold

    We ran the same steps with three thresholds typed into the Similarity threshold box:

    ThresholdRowsPairsDifference
    blank (default)105Mike/Michael and Acme/ACME missing
    0.6105Same 5 pairs
    0.9105Same 5 pairs
    0.3147Adds Mike/Michael and Acme/ACME

    Going from the default to 0.6 or 0.9 changed nothing on this list. At 0.3 the two missing pairs appeared, and no unrelated names such as Sofia Rossi or Omar Haddad were paired with them.

    Power Query result with 14 rows at threshold 0.3, now including Mike Johnson and Michael Johnson and Acme Corp and ACME Corporation
    Threshold 0.3: 14 rows, 7 pairs. Mike/Michael and Acme/ACME are now included.

    Dan Brown and Dana Brown were paired at every threshold we tried. A threshold does not tell you whether two similar names are the same person. That takes a person who can look at an address, an email, or an order history.

    Load the Candidate Pairs

    Choose Close & Load to put the pairs on a new sheet. With the 0.3 threshold, our sheet had 14 rows of pairs, and the original Customers sheet was unchanged.

    New worksheet listing 14 rows of name pairs with customer_name, Index and same_row columns
    The loaded candidate list: 14 rows, 7 pairs counted in both directions.

    Things to Know

    • One small test. This is one run on 18 names. We do not know how the same settings behave on other data, and we did not test a large list.
    • We cannot explain the misses. We saw that Mike Johnson and Acme Corp were not paired at the default, 0.6, or 0.9. We did not find out why.
    • Not tested. We did not use Maximum number of matches or a Transformation table.
    • Whitespace. The double-space pair was matched. For ordinary spaces and the non-breaking space, see why TRIM isn’t removing non-breaking spaces. We did not test that character here.
    • Exact duplicates. If you only need exact duplicates, Power Query’s Remove Duplicates is the simpler tool. To find items that are in one list and not in another, see comparing two lists.

    One-line Summary

    A fuzzy merge of a list with itself, minus the self-matches, gives a candidate list of near-duplicate names for a person to review. On our 18 names it found 5 pairs by default and 7 pairs at a threshold of 0.3, and it paired Dan Brown with Dana Brown at every threshold.

    Sources

    • Note: every result in this guide, including the pairs, the thresholds, and the formulas shown in the editor, comes from our own reproduction in the Excel 2021 desktop app. We did not check the fuzzy merge options against Microsoft’s documentation, so we make no claim about how the similarity score is calculated.
  • Extract Text Before or After a Character in Excel With LEFT, MID, and FIND

    You have an email address and want the part before the @, or the part after it. In newer Excel you can use TEXTBEFORE and TEXTAFTER. In older versions you can build the same thing from LEFT, MID, and FIND. This guide tests both on ten made-up text values and shows what each one returned, including what happened when the @ was missing and when it appeared twice.

    Applies to: Microsoft lists TEXTBEFORE for Excel for Microsoft 365 and Excel 2024. We tested in the Excel 2021 desktop app with an English interface on Korean-language Windows, so we could test only the LEFT, MID, and FIND method. We did not test other Excel versions.

    The Text

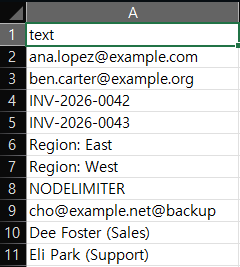
    Our Strings sheet has ten values in column A: two email addresses, two invoice codes (INV-2026-0042), two lines such as Region: East, the word NODELIMITER, an address with two @ characters (cho@example.net@backup), and two names with a department in parentheses. All values are fictional. We search for @, so only three of these values contain it. The others show what happens when the character is not there.

    Strings sheet with two email addresses, two invoice codes, two Region lines, NODELIMITER, an address with two @ and two names with departments
    Ten text values. Only three of them contain an @.

    The Classic Method: LEFT, MID and FIND

    We added the headers before_classic and after_classic in D1 and E1. In D2, enter:

    =LEFT(A2,FIND("@",A2)-1)

    In E2, enter:

    =MID(A2,FIND("@",A2)+1,100)

    Fill both down to row 11. Here is what each part does:

    • FIND("@",A2) returns the position of the first @ in the text.
    • LEFT(A2,position-1) returns everything before it.
    • MID(A2,position+1,100) returns up to 100 characters after it. The 100 is a limit we picked, so text longer than that would be cut off.
    Strings sheet with before_classic and after_classic columns: the emails are split, cho and example.net@backup, and the other rows show #VALUE!
    The LEFT/MID method splits the three @ values. The other seven rows show #VALUE!.

    The Result

    TextBefore @After @
    ana.lopez@example.comana.lopezexample.com
    ben.carter@example.orgben.carterexample.org
    cho@example.net@backupchoexample.net@backup
    INV-2026-0042, INV-2026-0043#VALUE!#VALUE!
    Region: East, Region: West#VALUE!#VALUE!
    NODELIMITER#VALUE!#VALUE!
    Dee Foster (Sales), Eli Park (Support)#VALUE!#VALUE!

    Two results are worth noting:

    • A missing character gives #VALUE!. Microsoft says FIND returns #VALUE! when it cannot find the text you ask for, and all seven rows without an @ show it. The error is not a sign that the formula is broken. It means there was nothing to split on. You could wrap the formula in IFERROR, but that hides every error, not only this one. We did not test that.
    • Two @ characters split at the first one. cho@example.net@backup returned cho before and example.net@backup after. The second @ stays in the second part. If you need the text after the last @, this formula does not do it, and we did not test a formula that does.

    What About TEXTBEFORE and TEXTAFTER?

    The newer functions do the same job in one step. We entered them in B2 and C2 of the same sheet, and filled them down:

    =TEXTBEFORE(A2,"@")
    =TEXTAFTER(A2,"@")
    Strings sheet where the TEXTBEFORE and TEXTAFTER formulas in columns B and C show #NAME? in every row
    In our Excel 2021, TEXTBEFORE and TEXTAFTER returned #NAME? in all ten rows.

    In our Excel 2021, all 20 cells showed #NAME?. Microsoft’s TEXTBEFORE page lists Excel for Microsoft 365 and Excel 2024, and Excel 2021 is not on that list. That matches what we saw. It also means we did not see how TEXTBEFORE handles a missing character or a second @, and we do not describe that here. If you get #NAME? after typing one of these functions, check your Excel version first. Our guide on splitting comma-separated values into rows covers another function that returned #NAME? in Excel 2021.

    Things to Know

    • Pick the character carefully. We searched only for @. We did not extract text around -, :, or ( in the other rows.
    • The first match only. FIND stops at the first match, as the two-@ row showed.
    • Formulas, not values. The results are formulas that depend on column A. We did not test copying them as values.

    One-line Summary

    Use LEFT with FIND for the text before a character and MID with FIND for the text after it, expect #VALUE! when the character is missing, and note that TEXTBEFORE and TEXTAFTER returned #NAME? in Excel 2021:

    =MID(A2,FIND("@",A2)+1,100)

    Sources

    • How to correct a #VALUE! error in FIND/FINDB and SEARCH/SEARCHB — Microsoft Support. Backs the statement that FIND returns #VALUE! when it cannot find the text.
    • TEXTBEFORE function — Microsoft Support. Backs the Applies-to list (Microsoft 365 and Excel 2024).
    • Note: the split results, the first-@ behavior, and the #NAME? results come from our own reproduction in the Excel 2021 desktop app, not from these pages.
  • Clean and Standardize US Phone Numbers in Excel (and Flag the Ones That Need Review)

    Phone numbers from different sources arrive in different shapes: with parentheses, dots, dashes, a leading +1, or stray spaces. You can strip them down to digits with SUBSTITUTE and then rebuild one standard format. The part that matters is what you do with the numbers that are not complete, so this guide flags those instead of guessing.

    We use ten made-up US-style numbers and show what each step returned, including the two numbers the formula refused to format.

    Applies to: Microsoft lists SUBSTITUTE and TEXT for Excel for Microsoft 365, Excel 2024, Excel 2021, Excel 2019, and Excel 2016. Tested in the Excel 2021 desktop app with an English interface on Korean-language Windows. We did not test other Excel versions. All numbers are fictional (555-01xx).

    The Raw Numbers

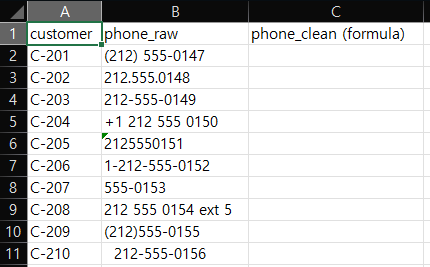
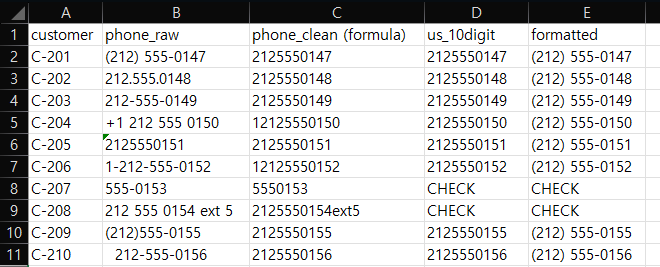
    Our Phones sheet has a customer ID in column A and the raw number in column B. All values in column B are text. The ten numbers use these shapes: (212) 555-0147, 212.555.0148, 212-555-0149, +1 212 555 0150, 2125550151, 1-212-555-0152, 555-0153 (no area code), 212 555 0154 ext 5 (with an extension), (212)555-0155, and 212-555-0156 with spaces in front.

    Phones sheet with customer IDs C-201 to C-210 and phone_raw values in ten different formats
    Ten numbers, ten shapes.

    Step 1: Keep Only the Digits

    In C2, enter this formula and fill it down to C11:

    =SUBSTITUTE(SUBSTITUTE(SUBSTITUTE(SUBSTITUTE(SUBSTITUTE(SUBSTITUTE(B2," ",""),"-",""),"(",""),")",""),".",""),"+","")

    Each SUBSTITUTE removes one character: a space, a dash, an opening parenthesis, a closing parenthesis, a dot, and a plus sign.

    Phones sheet with a phone_clean column showing digits only, including 12125550150, 5550153 and 2125550154ext5
    Only the listed characters are removed. The letters in ext 5 stay.

    Most rows now hold ten digits. Three rows look different:

    • +1 212 555 0150 and 1-212-555-0152 became 11 digits, because the leading 1 stayed.
    • 555-0153 became 7 digits.
    • 212 555 0154 ext 5 became 2125550154ext5. The formula removes only the six characters we listed, so the letters ext and the digit 5 stayed.

    The spaces in front of the last number were removed too.

    Step 2: Accept 10 Digits, Drop a Leading 1, Flag the Rest

    Add the headers us_10digit and formatted in D1 and E1. In D2, enter:

    =IF(AND(LEN(C2)=11,LEFT(C2,1)="1"),MID(C2,2,10),IF(LEN(C2)=10,C2,"CHECK"))

    This returns the last ten digits if the value has 11 digits and starts with 1. If it has exactly 10 digits, it returns them unchanged. Anything else becomes CHECK.

    In E2, enter:

    =IF(D2="CHECK","CHECK",TEXT(--D2,"(000) 000-0000"))

    --D2 turns the digit text into a number, and TEXT formats it with the pattern (000) 000-0000. Microsoft’s TEXT page says the second argument defines how the value is formatted. Our pattern is not one of its examples, so the screenshot below is our evidence for it. Fill both formulas down to row 11.

    Phones sheet with us_10digit and formatted columns: eight numbers shown as (212) 555-01xx and two rows marked CHECK
    Eight numbers are formatted. The 7-digit number and the extension row show CHECK.

    The Result

    Eight of the ten numbers came out as (212) 555-01xx, including the two with a leading 1 and the one with spaces in front. Two rows show CHECK in both columns:

    RawAfter Step 1Result
    555-01535550153CHECK (7 digits)
    212 555 0154 ext 52125550154ext5CHECK (letters left, not 10 or 11 digits)

    Those are the numbers a person should look at. The formula does not try to guess an area code or split off the extension.

    What This Formula Does Not Check

    • Only length and a leading 1. A string of 10 digits passes, even if it is not a real phone number or the area code does not exist. We did not validate area codes.
    • US-style numbers only. We did not test international numbers.
    • Extensions. They are flagged, not parsed.
    • Only ordinary spaces. The first SUBSTITUTE removes an ordinary space. If numbers copied from a web page still do not clean up, they may contain a non-breaking space, which SUBSTITUTE(B2," ","") does not match. See why TRIM isn’t removing non-breaking spaces. We did not test that character here.
    • Numeric cells. Our raw column holds text. We did not test numbers stored as real numbers.
    • The results are formulas and text. We did not test copying them as values.

    One-line Summary

    Remove the separators with nested SUBSTITUTE, keep 10 digits (or 11 with a leading 1), format them with TEXT, and let everything else show CHECK:

    =IF(AND(LEN(C2)=11,LEFT(C2,1)="1"),MID(C2,2,10),IF(LEN(C2)=10,C2,"CHECK"))

    Sources

    • SUBSTITUTE function — Microsoft Support. Backs the Applies-to list (Microsoft 365, 2024, 2021, 2019, 2016).
    • TEXT function — Microsoft Support. Backs the description of the format argument and the Applies-to list (Microsoft 365, 2024, 2021, 2019, 2016).
    • Note: the digits-only results, the 8 formatted numbers, the two CHECK rows, and the (000) 000-0000 result come from our own reproduction in the Excel 2021 desktop app, not from these pages. The numbers are fictional.
  • Split Full Names Into First and Last Name in Excel: A Simple Method and Its Limits

    A column of full names is easy to split if every name is two words. Real lists are not like that. They have middle names, suffixes such as Jr., and last names with several parts. A formula that takes the first word and the last word is quick to build, but it gets some of those names wrong.

    This guide builds that formula, runs it on ten made-up names, and shows exactly which names came out right and which did not. We also show what happened when we tried the newer TEXTBEFORE and TEXTAFTER functions in Excel 2021.

    Applies to: Microsoft lists TRIM and SUBSTITUTE for Excel for Microsoft 365, Excel 2024, Excel 2021, Excel 2019, and Excel 2016. We did not look up LEFT, RIGHT, FIND, and REPT on Microsoft’s pages. Tested in the Excel 2021 desktop app with an English interface on Korean-language Windows. We did not test other Excel versions.

    The Names

    Our Names sheet has ten full names in column A. Most are plain two-word names. The rest were chosen to cause trouble: a middle name (Cara Mae Brooks), suffixes (Ben Carter Jr., Dan Ortiz III, Jon Kim Sr.), a last name with a particle (Hal de la Cruz), a hyphenated name, a name with an apostrophe, and a name with two spaces between the words (Eve Hill). All names are fictional.

    Names sheet with ten full names including Ben Carter Jr., Cara Mae Brooks, Dan Ortiz III, Eve Hill and Hal de la Cruz
    Ten names, including a middle name, three suffixes, and de la Cruz.

    Step 1: Take the First Word

    In B2, enter this formula:

    =LEFT(TRIM(A2),FIND(" ",TRIM(A2)&" ")-1)

    Here is what each part does:

    • TRIM(A2) removes extra spaces, so the double space in Eve Hill becomes a single space.
    • FIND(" ",TRIM(A2)&" ") finds the position of the first space. We add a space at the end so the formula still works if a cell holds only one word.
    • LEFT(...,position-1) returns everything before that first space.

    Step 2: Take the Last Word

    In C2, enter this formula:

    =TRIM(RIGHT(SUBSTITUTE(TRIM(A2)," ",REPT(" ",100)),100))

    This one works in three moves. SUBSTITUTE replaces every space with 100 spaces. RIGHT(...,100) takes the last 100 characters, which is the last word surrounded by padding. TRIM removes the padding and leaves the last word.

    Fill both formulas down to row 11.

    The Result

    The formulas returned a first word and a last word for all ten rows. They were not always the right answer:

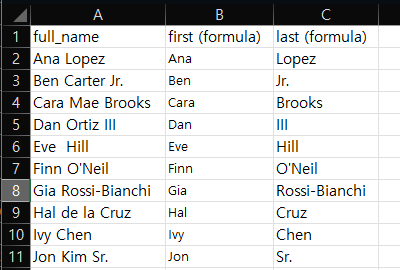
    Names with first and last word formulas: Jr., III and Sr. appear as last names, Mae and de la are missing from the results
    First and last word of each name. Jr., III and Sr. end up in the last column.
    Full nameFirstLastRight or wrong?
    Ana LopezAnaLopezRight
    Eve Hill (two spaces)EveHillRight, TRIM handled the extra space
    Finn O'NeilFinnO'NeilRight
    Gia Rossi-BianchiGiaRossi-BianchiRight
    Ivy ChenIvyChenRight
    Ben Carter Jr.BenJr.Wrong, the last name is Carter
    Dan Ortiz IIIDanIIIWrong, the last name is Ortiz
    Jon Kim Sr.JonSr.Wrong, the last name is Kim
    Cara Mae BrooksCaraBrooksIncomplete, Mae is in neither column
    Hal de la CruzHalCruzIncomplete, de la is lost

    Five names came out right and five did not. The three suffix names show the suffix as the last name, the middle name is dropped, and the particle de la is dropped from the last name. The formula cannot tell a suffix or a particle from an ordinary name, because it only counts words.

    Where This Method Breaks

    • Suffixes. Jr., III, and Sr. become the last name.
    • Middle names. The middle word is not in either column. Whether you call it a middle name or part of the first name depends on your data, and the formula does not decide.
    • Last names with several parts. de la Cruz becomes Cruz. Other multi-part names would be cut the same way.

    We did not build a formula that fixes these cases. If your list has them, one practical option is to treat any name with more than two words as a row to review by hand. We did not test a formula for that, so check it on your own data first.

    What About TEXTBEFORE and TEXTAFTER?

    Newer Excel has TEXTBEFORE and TEXTAFTER, which can split on a character without the padding trick. We tried them in the same sheet:

    =TEXTBEFORE(TRIM(A2)," ")
    =TEXTAFTER(TRIM(A2)," ",-1)
    Names sheet where the TEXTBEFORE and TEXTAFTER formulas in columns D and E show #NAME? in every row
    In our Excel 2021, TEXTBEFORE and TEXTAFTER returned #NAME? in all ten rows.

    In our Excel 2021, all ten rows in both columns showed #NAME?. Microsoft’s page for TEXTBEFORE lists Excel for Microsoft 365 and Excel 2024, and Excel 2021 is not on that list. So we do not know how these two functions handle the ten names above, and we did not compare them with the first-word and last-word formulas.

    If you see #NAME? after typing one of these functions, check your Excel version before you look for a typo. Our guide on splitting comma-separated values into rows shows another function that gave #NAME? in Excel 2021. Our guide on extracting text before or after a character shows the same #NAME? result for TEXTBEFORE and TEXTAFTER.

    Things to Know

    • Only ordinary spaces. TRIM removes ordinary spaces. Microsoft says it does not remove the non-breaking space (character 160). If a name from a web page does not split correctly, see why TRIM isn’t removing non-breaking spaces. We did not test that character here.
    • One-word names. We did not test a cell that holds only one word.
    • Original data. The formulas sit in new columns, so column A is unchanged.

    One-line Summary

    The first-word and last-word formulas split plain two-word names correctly, but they put suffixes such as Jr. in the last-name column and drop middle names and particles like de la, so review those rows by hand:

    =LEFT(TRIM(A2),FIND(" ",TRIM(A2)&" ")-1)

    Sources

    • TRIM function — Microsoft Support. Backs what TRIM removes, the note that it does not remove the non-breaking space (character 160), and the Applies-to list (Microsoft 365, 2024, 2021, 2019, 2016).
    • SUBSTITUTE function — Microsoft Support. Backs the Applies-to list (Microsoft 365, 2024, 2021, 2019, 2016).
    • TEXTBEFORE function — Microsoft Support. Backs the Applies-to list (Microsoft 365 and Excel 2024).
    • Note: the ten results, the #NAME? results for TEXTBEFORE and TEXTAFTER, and the right-or-wrong judgment for each name come from our own reproduction in the Excel 2021 desktop app, not from these pages.
  • How to Compare Two Lists in Excel (Find Missing, Extra, and Duplicate Items)

    You have a master list of product codes and a list of what actually arrived. Which codes are missing, which are extra, and which appear twice? Excel can answer all three, but the answer depends on the method, because some methods ignore case or spaces and others do not.

    This guide uses two short made-up lists and runs five methods on them: two COUNTIF checks, a duplicate count, a FILTER formula, and a Power Query merge. We show exactly what each one returned, including two rows that behaved differently from what you might expect.

    Applies to: Microsoft lists COUNTIF, FILTER, XMATCH, and Power Query merge for Excel for Microsoft 365, Excel 2024, and Excel 2021, and TRIM also for Excel 2019 and 2016. Tested in the Excel 2021 desktop app with an English interface on Korean-language Windows. We did not test other Excel versions.

    The Two Lists

    Sheet ListA is the master list: 12 codes from A-101 to A-111, with A-108 entered twice. Sheet ListB is the received list: 11 codes, including a-106 in lowercase, A-105 followed by a space (we added it on purpose, and you cannot see it on screen), and the extra codes A-112 and A-113, with A-113 entered twice. All codes are fictional.

    Two lists side by side: sku_master with A-101 to A-111 and A-108 twice, and sku_received including a-106, A-112 and A-113 twice
    The master list (left) and the received list (right).

    Step 1: Find Items Missing From the Other List

    On ListA, in B2, enter this formula and fill it down to B13:

    =IF(COUNTIF(ListB!$A$2:$A$12,A2)=0,"MISSING","ok")

    COUNTIF counts how many times the code in A2 appears in the ListB range. A count of zero means the code is missing from the received list.

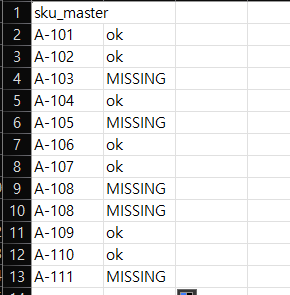
    ListA with a MISSING or ok flag in column B: A-103, A-105, both A-108 rows and A-111 are MISSING
    Five rows are flagged MISSING, including A-105.

    Five rows came back MISSING: A-103, A-105, both A-108 rows, and A-111. Two of those results are worth a closer look:

    • A-106 was not flagged, even though ListB holds a-106 in lowercase. Microsoft says COUNTIF does not distinguish upper case from lower case, and our result agrees.
    • A-105 was flagged, even though ListB appears to contain it. The ListB cell is A-105 followed by a space, so the two values are not identical. Microsoft notes that leading or trailing spaces can make COUNTIF return unexpected values.

    Step 2: Find Extra Items and Trim the Spaces

    Now check the other direction. On ListB, in B2, enter this formula and fill it down to B12:

    =IF(COUNTIF(ListA!$A$2:$A$13,TRIM(A2))=0,"EXTRA","ok")

    This time TRIM(A2) removes extra spaces from the ListB code before it is counted.

    ListB with an EXTRA or ok flag in column B: A-112 and both A-113 rows are EXTRA, A-105 and a-106 are ok
    A-112 and both A-113 rows are EXTRA. A-105 now counts as a match.

    A-112 and both A-113 rows came back EXTRA. A-105 is now ok, because TRIM removed the trailing space. a-106 is ok as well.

    Notice that this trimmed only the ListB value inside the formula. In Step 1 the extra space sits in ListB, so adding TRIM(A2) to the Step 1 formula would not fix it. Step 4 shows a version that trims the whole ListB range.

    Step 3: Find Duplicates

    On ListA, in C2, enter this formula and fill it down to C13:

    =COUNTIF($A$2:$A$13,A2)

    Each cell now shows how many times its own code appears in the list. We also used Conditional Formatting > Highlight Cells Rules > Duplicate Values on column A to color the repeated codes.

    ListA with a COUNTIF count in column C: both A-108 rows are highlighted and show 2, every other code shows 1
    Both A-108 rows show a count of 2 and are highlighted.

    Both A-108 rows show 2 and are highlighted. Every other code shows 1. We checked duplicates in the master list only.

    Step 4: Get the Differences as a List

    Instead of flags next to each row, you can have Excel return the missing codes as a list. On a new sheet (we called it Result), enter this in A2:

    =FILTER(ListA!A2:A13,ISNA(XMATCH(ListA!A2:A13,TRIM(ListB!A2:A12))))

    Here is what each part does:

    • TRIM(ListB!A2:A12) removes extra spaces from every code in the received list.
    • XMATCH(...) looks up each master code in the trimmed list. A code that is not found returns #N/A.
    • ISNA(...) turns each #N/A into TRUE.
    • FILTER(...) keeps the master codes where the answer is TRUE, and the results spill down the sheet.
    Result sheet with the FILTER and XMATCH formula in the formula bar and the spilled results A-103, A-108, A-108 and A-111
    The formula returns four codes. A-108 appears twice.

    The result has four rows: A-103, A-108, A-108, and A-111. A-105 is not listed, because the trim removed the space. A-106 is not listed either, so XMATCH ignored the difference in case in our test. The duplicate A-108 is kept, so it shows up twice. Microsoft lists FILTER and XMATCH for Excel for Microsoft 365, Excel 2024, and Excel 2021. We did not test older versions.

    Step 5: Compare With Power Query

    Power Query can do the same comparison with a merge. In our test it was stricter than the formulas above.

    1. Select the master list on ListA, then choose Data > From Table/Range. In the Create Table box, check My table has headers, then click OK.
    2. In the Power Query Editor, choose Home > Close & Load To… > Only Create Connection.
    3. Repeat for ListB.
    4. Choose Data > Get Data > Combine Queries > Merge. Pick the master query on top and the received query below, click the code column in each preview, and set Join Kind to Left Anti (rows only in first). Click OK.
    Power Query Merge dialog with sku_master on top, sku_received below and Join Kind set to Left Anti (rows only in first)
    Merge with Left Anti: keep rows that exist only in the first table.

    Microsoft describes a left anti join as bringing in only the rows from the primary table that have no matching row in the related table. That is the “missing from the other list” check.

    Power Query Editor showing the Left Anti merge result: A-103, A-105, A-106, A-108 twice and A-111, with the Source applied step
    The merge returns six rows, including A-105 and A-106.

    The merge returned six rows: A-103, A-105, A-106, A-108 (twice), and A-111. Compare that with the FILTER result. A-105 and A-106 are in the list, because in our test the merge did not treat A-105 with a trailing space or lowercase a-106 as the same as the master codes. We did not use any cleaning step or case option, so we cannot say what every setting would do.

    If you set up this merge and My table has headers is unchecked, Excel names the column Column1 and turns the header text into a data row. We did that on our first try, and the header text showed up in the result as if it were a code.

    Which Method to Use

    MethodWhat it returnsCase and spaces in our test
    COUNTIF flag (Steps 1 and 2)A flag next to each row, in either directionCase ignored. A trailing space prevented a match until we added TRIM.
    COUNTIF count (Step 3)How many times each code appearsNot tested for case or spaces.
    FILTER + XMATCH + TRIM (Step 4)A list of the missing codesCase ignored. The trailing space was trimmed. Duplicates kept.
    Power Query Left Anti (Step 5)A table of the missing codesa-106 and A-105 were not matched. Duplicates kept.

    If you only need to see the problem rows, use the flags. If you need a list to send to someone, use FILTER or the merge, and decide first whether case and spaces should count as differences.

    What These Tests Do Not Cover

    • Only ordinary spaces. TRIM removes ordinary spaces. Microsoft says it does not remove the non-breaking space (character 160). We did not test that character here. If a code still does not match after TRIM, see why TRIM isn’t removing non-breaking spaces. For a lookup that returns #N/A on values that look the same, see VLOOKUP returns #N/A when values look identical.
    • Other versions and settings. We did not test Excel 2019 or earlier, XLOOKUP, or any case option in Power Query.
    • Other data. We used text codes only. Numbers stored as text, longer lists, and lists with more than one difference per row were not tested.
    • Removing duplicates. This guide finds them. To remove them, see removing duplicates with Power Query.

    One-line Summary

    Use COUNTIF flags to see missing and extra codes, COUNTIF counts to see duplicates, and FILTER with XMATCH and TRIM to list the differences, and check your own data for case and spacing before you trust a merge:

    =FILTER(ListA!A2:A13,ISNA(XMATCH(ListA!A2:A13,TRIM(ListB!A2:A12))))

    Sources

    • Use the COUNTIF function — Microsoft Support. Backs the statement that COUNTIF does not distinguish case, the note on leading or trailing spaces and nonprinting characters, and the Applies-to list (Microsoft 365, 2024, 2021).
    • FILTER function and XMATCH function — Microsoft Support. Back the Applies-to lists (Microsoft 365, 2024, 2021).
    • TRIM function — Microsoft Support. Backs what TRIM removes, the note that it does not remove the non-breaking space (character 160), and the Applies-to list (Microsoft 365, 2024, 2021, 2019, 2016).
    • Merge queries (Power Query) — Microsoft Support. Backs the description of a left anti join and the Applies-to list (Microsoft 365, 2024, 2021). The page does not say whether merge matching is case sensitive.
    • Note: the MISSING, EXTRA, and count results, the FILTER output, the six-row merge result, and the a-106 and A-105 behavior come from our own reproduction in the Excel 2021 desktop app, not from these pages.
  • Replace Inconsistent Labels (USA, U.S., United States) With One Standard Value Using a Lookup Table

    The same country shows up as USA, U.S., US, and United States. A PivotTable counts them as four different countries. Instead of fixing them one by one with Find and Replace, keep a small lookup table that maps every spelling to one standard value, and let a formula do the replacing.

    This guide builds that table with ten made-up customers, shows the formula, and lists exactly which labels were mapped and which were not.

    Applies to: Microsoft documents VLOOKUP for Excel for Microsoft 365, Excel 2024, Excel 2021, Excel 2019, and Excel 2016. Tested in the Excel desktop app with an English interface on Korean-language Windows. We did not test other Excel versions, so results may differ there.

    The Messy Column

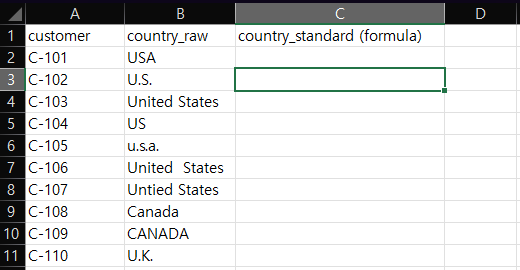
    Our Labels sheet has ten customers and a country_raw column. It holds USA, U.S., United States, US, u.s.a., a United States with two spaces between the words, a typo (Untied States), Canada, CANADA, and U.K. All names are fictional.

    Labels sheet with customer IDs and country_raw values such as USA, U.S., US, u.s.a. and CANADA
    Ten customers, and at least four spellings of the same country.

    Step 1: Build the Lookup Table

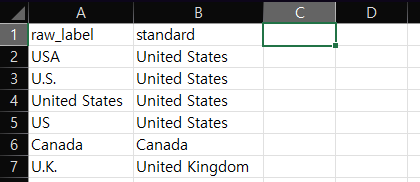
    On a separate sheet (we called it CountryMap), put the spelling you see in column A and the standard value in column B. We used six rows: USA, U.S., United States, and US all point to United States, Canada points to Canada, and U.K. points to United Kingdom.

    CountryMap sheet with raw_label and standard columns mapping USA, U.S., US, Canada and U.K.
    The lookup table: every known spelling in column A, one standard value in column B.

    The table does not contain u.s.a., CANADA, the double-space version, or the typo. They are there on purpose, to show what the formula does with them.

    Step 2: Look Up the Standard Value

    In the cell next to the first label (C2), enter this formula and fill it down to C11:

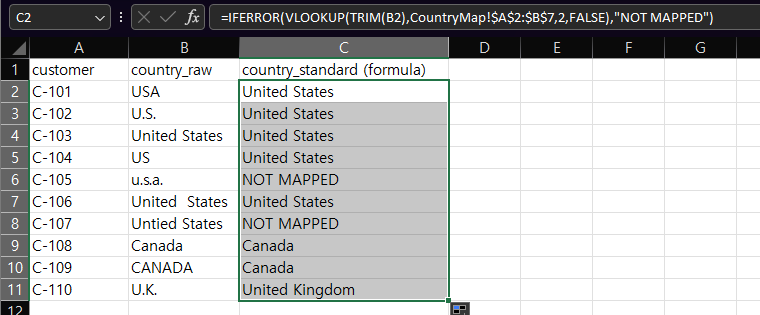
    =IFERROR(VLOOKUP(TRIM(B2),CountryMap!$A$2:$B$7,2,FALSE),"NOT MAPPED")

    Here is what each part does:

    • TRIM(B2) removes extra spaces from the label before the lookup.
    • VLOOKUP(...,2,FALSE) finds the label in column A of the table and returns the matching value from column B. FALSE asks for an exact match.
    • IFERROR(...,"NOT MAPPED") shows NOT MAPPED when the label is not in the table. Without it, those rows would show #N/A.
    Labels sheet with VLOOKUP formula results: two NOT MAPPED rows and the formula in the formula bar
    The formula in C2 filled down to C11, with the formula bar showing it.

    What Happened to Each Label

    Raw labelResultWhy
    USA, U.S., United States, USUnited StatesListed in the table
    United States (two spaces)United StatesTRIM collapsed the extra space
    CanadaCanadaListed in the table
    CANADACanadaMatched even though the case differs (our observation)
    U.K.United KingdomListed in the table
    u.s.a.NOT MAPPEDNot in the table
    Untied StatesNOT MAPPEDA typo, not in the table

    Eight of the ten rows were mapped and two were not. The NOT MAPPED text is the point of the formula: it turns a silent mistake into something you can filter for.

    Microsoft’s page says leading spaces, trailing spaces, and nonprinting characters can cause unexpected VLOOKUP results. It does not say whether the match ignores case. The CANADA result is what we saw in our test, so check your own data.

    How to Handle the NOT MAPPED Rows

    Filter column C for NOT MAPPED and decide for each one. For u.s.a., add a new row to the table. For the typo, you can add the typo as another row in the table or fix the source value. We did not re-run the formula after changing the table. To check one list of values against another, see our guide on comparing two lists in Excel.

    If you add rows to the table, make sure the formula range still covers them. Ours ended at row 7 ($A$2:$B$7).

    Things to Know

    • IFERROR hides every error, not only a missing label. A bad range or a broken sheet name would also show NOT MAPPED. If everything shows NOT MAPPED, check the formula first.
    • TRIM does not remove non-breaking spaces. If a label with a visible space still does not map, see why TRIM isn’t removing non-breaking spaces.
    • If VLOOKUP returns #N/A on values that look identical, see VLOOKUP returns #N/A when values look the same.
    • We tested VLOOKUP only. We did not test XLOOKUP for this guide.

    One-line Summary

    Keep a two-column table of every spelling and its standard value, then use this formula and filter for NOT MAPPED to find the labels you still have to handle:

    =IFERROR(VLOOKUP(TRIM(B2),CountryMap!$A$2:$B$7,2,FALSE),"NOT MAPPED")

    Sources

    • VLOOKUP function — Microsoft Support. Backs the exact-match behavior of FALSE, #N/A when no exact match is found, the warning about leading and trailing spaces and nonprinting characters, and the Applies-to list (Microsoft 365, 2024, 2021, 2019, 2016).
    • Note: the ten-row result, the CANADA match, the two NOT MAPPED rows, and the TRIM effect on the double-space label come from our own reproduction in the Excel desktop app, not from this page.